Showing posts with label linux. Show all posts

Wednesday, March 20, 2019

Ubuntu: How to get passphrase-less / password-less SSH set up with GoDaddy

Step 1: Login to GoDaddy with your credentials.
Step 2: Click on "My Products", then click "Manage" on the website you wish to use SSH with.
Step 3: Click "Manage Hosting"


Step 4: Once on the Hosting page, click "Settings" on the website whose hosting you want to access via SSH.


Step 5: Click "cPanel Admin".  Now you're on the cPanel for your website's hosting. Click on "SSH Access", then "Manage SSH Keys".


Step 6: Delete any Public and Private keys that you may already have there.  Open a terminal window.  Navigate to your home directory, and then to the .ssh/ directory.
cd ~
cd .ssh

Step 7:  Once here, you may notice that there are already some files, such as id_rsa, id_rsa.pub and known_hosts.  If you wish to back them up, rename them.  Otherwise we will proceed to generate a new key pair (public and private), and overwrite the ones that already exist.
Type the command ssh-keygen -t rsa -b 4096 and press enter.  When prompted for the file name just press <enter> to use the default name (id_rsa), and if prompted to overwrite press y and then <enter>.  When prompted for a passphrase, just press <enter> twice, unless you want to enter in a pesky password every time you login to your hosting in addition to the public/private key pair.  You now have a public and private key pair which you will use to login to your GoDaddy hosting.


Step 8:  Now that you have your public/private key pair, it's time to provide them to GoDaddy so that you're able to login using SSH.  Under "SSH Access" (where we were before), click "Import Key".


Step 9: Type cat id_rsa to print your private key to your terminal window.  Copy it and paste it into the text box provided (shown below).  Leave the first textbox (name) empty, and the passphrase box empty.  Repeat the same process for id_rsa.pub, which is your private key.  Copy that into the last textbox on the page.  Click "Import" at the bottom of the page.


Step 10: Important! Click "Back to Manage Keys", then under Public Keys, click "Manage", and then "Authorize".  If you don't authorize the key, you won't be able to login.


Step 11: Repeat steps 1-4 to get back onto the GoDaddy Hosting page for your domain.  You'll notice a section on the bottom right called "Settings".  Under that section you'll see "SSH access".  If it is turned off, you'll need to turn it on.  Upon turning it on, you'll be presented with the IP address and username that you'll need to log in using SSH.  Note these down.


Step 11:  Open a new terminal window.  Type ssh myusername@<hosting_ip_address>.  Use the username and IP address you picked up in the previous step and press <enter>.  Enter yes when prompted about an unknown host.  And voila!  You're in!  Now you'll be able to access and manage your files from your Ubuntu terminal without ever being asked for a password again!

Tuesday, June 23, 2015

What is the colon equals sign ( := ) in makefiles?

Andrew (2015/06/23):  I posted this article on a blog many months ago, which has long since disappeared off the internet.  A few people found it useful at the time, so I decided to repost it here:

In Linux Makefiles, you will often see a notation which looks like this:
This is called "expansion assignment".
So what's the difference between expansion assignment and ordinary variable assignment (=)? Let's get straight into a coding example:
So nothing unexpected or unusual here! But lets try the same thing using expansion assignment ( := ):
Oh no! It appears that we have a frog instead of the porcupine we wanted. So what happened?
When using the equals sign the variable is only expanded when used. In other words, when we run test.

In the second example we used ":=".  This means that the variable is expanded at the time of assignment. If we want to see PORCUPINE again in the second example, we need to make a slight modification to it:

Sunday, May 17, 2015

Custom DST on Linux via the POSIX TZ environment variable

Fig 1: Geographical regions currently using DST (in 2013), in blue and orange.
Image credit:   TimeZonesBoy (Own work) [CC BY-SA 3.0 (http://creativecommons.org/licenses/by-sa/3.0)], via Wikimedia Commons


If you are reading this article, you are probably writing software for, or porting Linux on devices that other people will use.  People who use Linux on their general purpose Desktop machines have no interest in fiddling with custom timezones or custom DST.  Doing so will upset your web browser, among other things.

But for those of us who have to worry about custom timezones, here is a 'getting started' guide that may help.

First of all, disambiguation of DST terminology should help a lot (at least it did for me).  Below is a diagram of what happens/happened to the clocks in Melbourne, Australia, for the year 2015.

Fig 2: DST time in Melbourne, AU, 2015.

The blue part represents what we call "standard time" or STD; or in other words, where the clocks would be all-year-round if DST didn't exist (which it arguably shouldn't).  The yellow part represents "daylight savings time" or DST.

Different geographical locations have different names for their standard time and daylight savings time.  Stockholm (Sweden) is using so-called "CEST" (Central European Summer Time) during DST, and "CET" (Central European Time) during its STD period.  Important note: "Summer Time" is just another name for DST used in some European countries.

Yes, your head may be a bit confused right now.  It can be for many people.  For example;
  • "AEST" is "Australian Eastern Standard Time"; and
  • "CEST" is "Central European Summer Time".
One is referring to DST and the other one is referring to STD.  Careful about that.

So what happens when one crosses over the border from blue part to the yellow part (DST) shown above?  Well, by official definition, a geographical location always advances the clocks when crossing the border into DST.  That is, we lose sleep when it starts, and gain sleep when it ends.  And it's usually an hour of sleep that we lose/gain.  But using the TZ variable, it can be any number of minutes you desire; not necessarily 60 minutes.

Now to the 'nitty-gritty' of the POSIX 'TZ' variable.  This is how you can set set your own custom version of what you see in figure 2.  You can choose when the 'blue' and 'yellow' parts start and end, and how much time is lost or gained at the crossing of each border.
The POSIX 'TZ' variable is defined as so:
std offset dst [offset],start[/time],end[/time]
Fig 3: The POSIX 'TZ' variable.

Here it is.  The golden TZ variable.  You're going to want to refer back to it many times; here, or on the GNU manual page or elsewhere.  Rather than explain what each part of figure 3 means, maybe jumping straight into some examples is clearer:


Example 1:
TZ=CST6CDT,M3.2.0/2:00:00,M11.1.0/2:00:00
In English:

  • This would jump into DST (and lose an hour of sleeep) on the 2nd Sunday of the third month (March) at 2:00:00.  Eg. For 2015, we jump into DST on 8 MAR 2015 2:00:00.
  • This would jump out of DST (daylight savings time) on the 1st Sunday of the eleventh month (November) at 2:00:00 and we get an hour of sleep back.  Eg. For 2015, jump out of DST on 1 NOV 2015 2:00:00.
  • In this instance, the option DST [offset] omitted, and so defaults to an hour.


Example 2:
TZ=NZST-12:00:00NZDT-13:00:00,M10.1.0,M3.3.0
In English:
  • In this example, we have omitted the start and end [/time]'s, so it is assumed to be 2:00:00.
  • This would jump into DST (and lose an hour of sleep) on the 1st Sunday of October 2:00:00.   Eg. For 2015, we jump into DST on 4 OCT 2015 2:00:00.
  • This would jump out of DST (and gain and hour of sleep) on the 3rd Sunday of March 2:00:00.  Eg. For 2016, we jump out of DST on 20 MAR 2016 2:00:00.
  • Be careful if you were to manually set the time using the "date -s" command in the time period between 1:00:00 and 2:00:00 on 20 MAR 2016, as this is an "ambiguous" time period (it is experienced twice; once in the 'lead up' to exiting DST, and once again, when the clocks are set back an hour).
Example 3:
TZ=ABCST4ABCDT,J5/0,J100/22
In English:
  • This example uses an entirely fictitious "ABC" standard and daylight savings time. 
  • In this example, we aren't using the 'Mm.w.d' format shown in the above two examples.  We are using "Julian Days" from 0 to 365.
  • In this example we will use 2015 as the example year.
  • We jump into DST (lose an hour of sleep) at the stroke of midnight on the 4 JAN 2015.  To be clearer, we jump directly from 4 JAN 2015 23:59:59 to 5 JAN 2015 01:00:00.
  • We jump out of DST (gain an hour of sleep) on the 22nd hour of the 10th April 2015, i.e. 10 APR 2015 22:00:00.


Some extra things worth mentioning:

  1. Environment variable scope is an issue when using the 'TZ' variable.  Exporting the TZ variable will affect the current process; and any processes spawned from it (child processes) will get a copy.  Parent processes will not be affected.
  2. There's more than one way to cook an egg.  If the TZ variable is not suitable for you, you may also consider a timezone database (zic input files), and the zic compiler.
    This page is the best resource I can find about this method.  It includes good examples.


Monday, November 24, 2014

Serio: A serial file transfer program without needing z/y/xmodem

In one of my previous posts I talked about using zmodem as a backup/emergency method to transfer files onto an embedded device using the serial console.  This technique requires you to have the lrz binary on the target to initiate the transfer.  But what happens if you have no way of getting lrz onto the target in the first place?  In this post I show you a method of serial transfer requiring no binaries to be on the target, and absolutely no setup on the target-side.

First, check that you have a Python 2.x version installed.  If you don't, apt-get or yum install it onto your host OS.  Check the version with python --version.

Now get the utility, which is called 'serio'.  Get it with hg clone https://code.google.com/p/serio/. Before you go ahead, there are two patches you need to apply (by hand):

Patch 1:
Insert self.last_size = 0 at the location shown, highlighted in green:
if callable(fp.read) and callable(fp.write) and callable(fp.readline) and callable (fp.readlines):
                        self.fp = fp
                        self.current = 0
                        self.showprogress = progress

                        self.last_size = 0 


Patch 2:
Get rid of this line, on line 19:
self.s.open()

and insert these lines instead:
already_open = self.s.isOpen()
if not already_open:
        self.s.open()


Update (14 June 2015): I tried this again recently.  It seems you may need to use self.serial.isOpen() and self.serial.open() instead.

That patch above is for people who get the "Port is already open" error.  Now you can run the utility:


sudo ./serio -s lrz -d lrz -p /dev/ttyS0

where -s is the source file, -d is the destination, and -p is the serial (console) port.  You'll get a nice progress bar.


I recommend putting lrz onto your target (as per my example) so you can do zmodem transfers from here on in.


Help!  It transfers, but the executable doesn't work!
  • Check that the echo command on your target supports the "-n" and "-e" options (that's all you need).
  • Try cross-compiling a minimal "hello world" program with your toolchain and try transferring that, as a test.  Run it, and if you see "hello world" your settings are probably OK.  See the next point...
  • Open the source code and modify the parameter IO_TIME = .1 to be something greater than .1 (try .3 or .5).
  • In addition to the previous step, try using your toolchain's strip command to reduce the size of the binary.

Sunday, November 16, 2014

Ubuntu - Open custom terminal windows on startup or login

If you find yourself opening the same terminal windows every day, you might want to speed that up by having them automatically open up when you log in.  Here's how you do it.

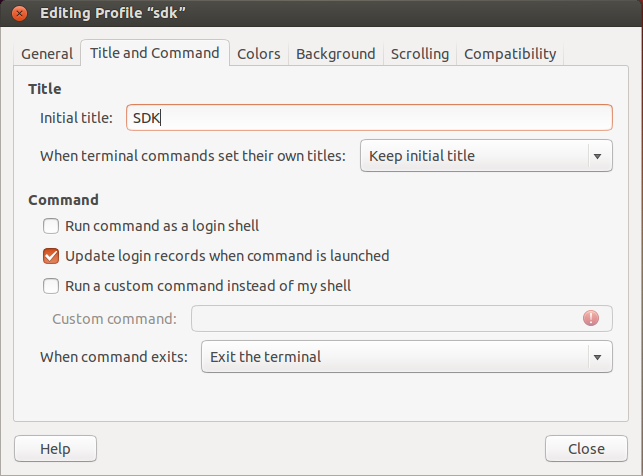
Open up a terminal window, and click Edit... -> Profiles... 
Then click "New", and make a new profile.
In this case, I want to make one for  the SDK I'm working with.  I'm calling the profile "sdk", and I'm setting the title of the window to be "SDK" (in capitals).  The option under that is important.  I'm setting it to "Keep initial title" so that my custom title ("SDK") will stick, even if the terminal session tries to change it.  Here you can also change the background, text colour, and so on...

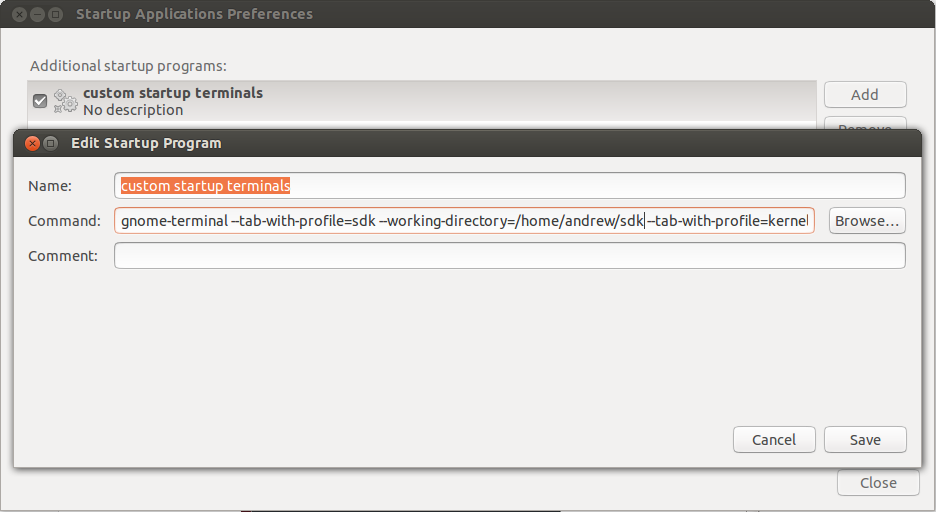
Once you've made a few profiles, navigate to Ubuntu's "startup applications" (as shown left).


Click "Add".
I like to work with tabs, so for my Command I did: gnome-terminal --maximize --tab-with-profile=sdk --working-directory=/home/andrew/sdk --tab-with-profile=kernel --working-directory=/home/andrew/kernel...

And I continued doing that for four tabs.  The --maximize option is there so they start up maximized.


The result is shown below.  This happens every time I log in.  For the profile shown I chose light grey text on a dark grey background.  Many people like to have a different background colour for each task that they're doing (maybe 'green' for debug console, 'blue' for temp directory, and so on).  You can have separate windows instead of tabs if you want, too.


Thursday, November 6, 2014

Edimax EW-7811Un Wi-fi dongle on Ubuntu


The EW-7811Un is a cheap and fairly ubiquitous Wi-fi dongle.  If your Ubuntu installation doesn't come with a driver; here's how to get it working.  I'm using Ubuntu 13.04.


This wi-fi dongle is based on the RTL8188CUS chip.  Verify that this part number shows up on lsusb (mine's on the top line):


Do a Google search for RTL8188CUS driver, download and unzip the driver (from the Realtek site is better).  It should be called RTL8188C_8192C_USB_linux_v4.0.2_9000.20130911.zip (md5: 5f15575ba6ae58cae485e8060bc771ed).  You should see this:


Go to driver/, extract the .tar.gz.  Then all you should need is a make and a (sudo) make install to be in business.

Tuesday, October 21, 2014

Zmodem and minicom


Zmodem is a great "emergency backup" way of getting files on and off your target board when all other methods (SD card, ethernet, etc.) have stopped working or you don't have those functions yet.

In order to use Zmodem with Minicom, you need to first cross-compile the 'lrzsz' source code.


What happens if I can't get this file onto my target to begin with?   If this your situation, don't panic!  See my other serial transfers post.


Do a google search for lrzsz-0.12.20.tar.gz, untar it, and configure it with the following command:

CC=arm-linux-uclibc-gcc ./configure --host=arm-linux-uclibc --prefix=/home/andrew/lrzsz_out/

You'll obviously need to replace the CC, --host and --prefix with your own.  Then run:

make; make install

From all the binaries which are built, you're only going to need lrz (for receiving) and lsz (for sending).

If you want to receive a file (that is, get a file onto your target board), you first run the ./lrz binary from anywhere on the target's filesystem, and you'll get a message 'waiting to receive' (along with some ascii garble).


Then you press ctrl+a+z and then s , and then choose 'zmodem'.


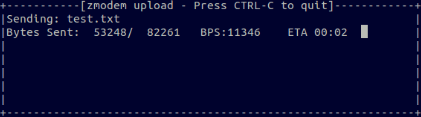
After you select 'zmodem' and choose your file from the file browser, you'll see the file uploading to your target, with an ETA (time left).


Sending works similarly, except you use the ./lsz binary and select "receive" from the minicom menu instead.